Real-world air traffic on your radar — for flight simulation and aviation enthusiasts
1. Getting Started
System Requirements
Java 8 or later (bundled with macOS .app and Windows standalone .exe)
Internet connection for live traffic data
A valid RealTraffic license (Standard or Professional)
Installation
macOS
Open the downloaded DMG and drag RealTraffic Standalone.app into your Applications folder. The app bundles its own Java runtime—no separate Java installation required.
Windows
Run the downloaded .exe installer. The standalone version bundles Java; the standard version requires a separate Java 8+ installation.
Linux
Ensure Java 8+ is installed, then run java -jar RealTraffic.jar.
First Launch
On first launch you will be asked to accept the End-User License Agreement (EULA).
A dialog will prompt you to select your initial airport location from the Spotter/ATC location dropdown. The default is YSSY (Sydney).
Open Settings > License and enter your license name and key. Licenses can be purchased at flyrealtraffic.com.
Position and resize the application window, then click Save Settings.
Restart the application. Live traffic will begin appearing on the map within a few seconds.
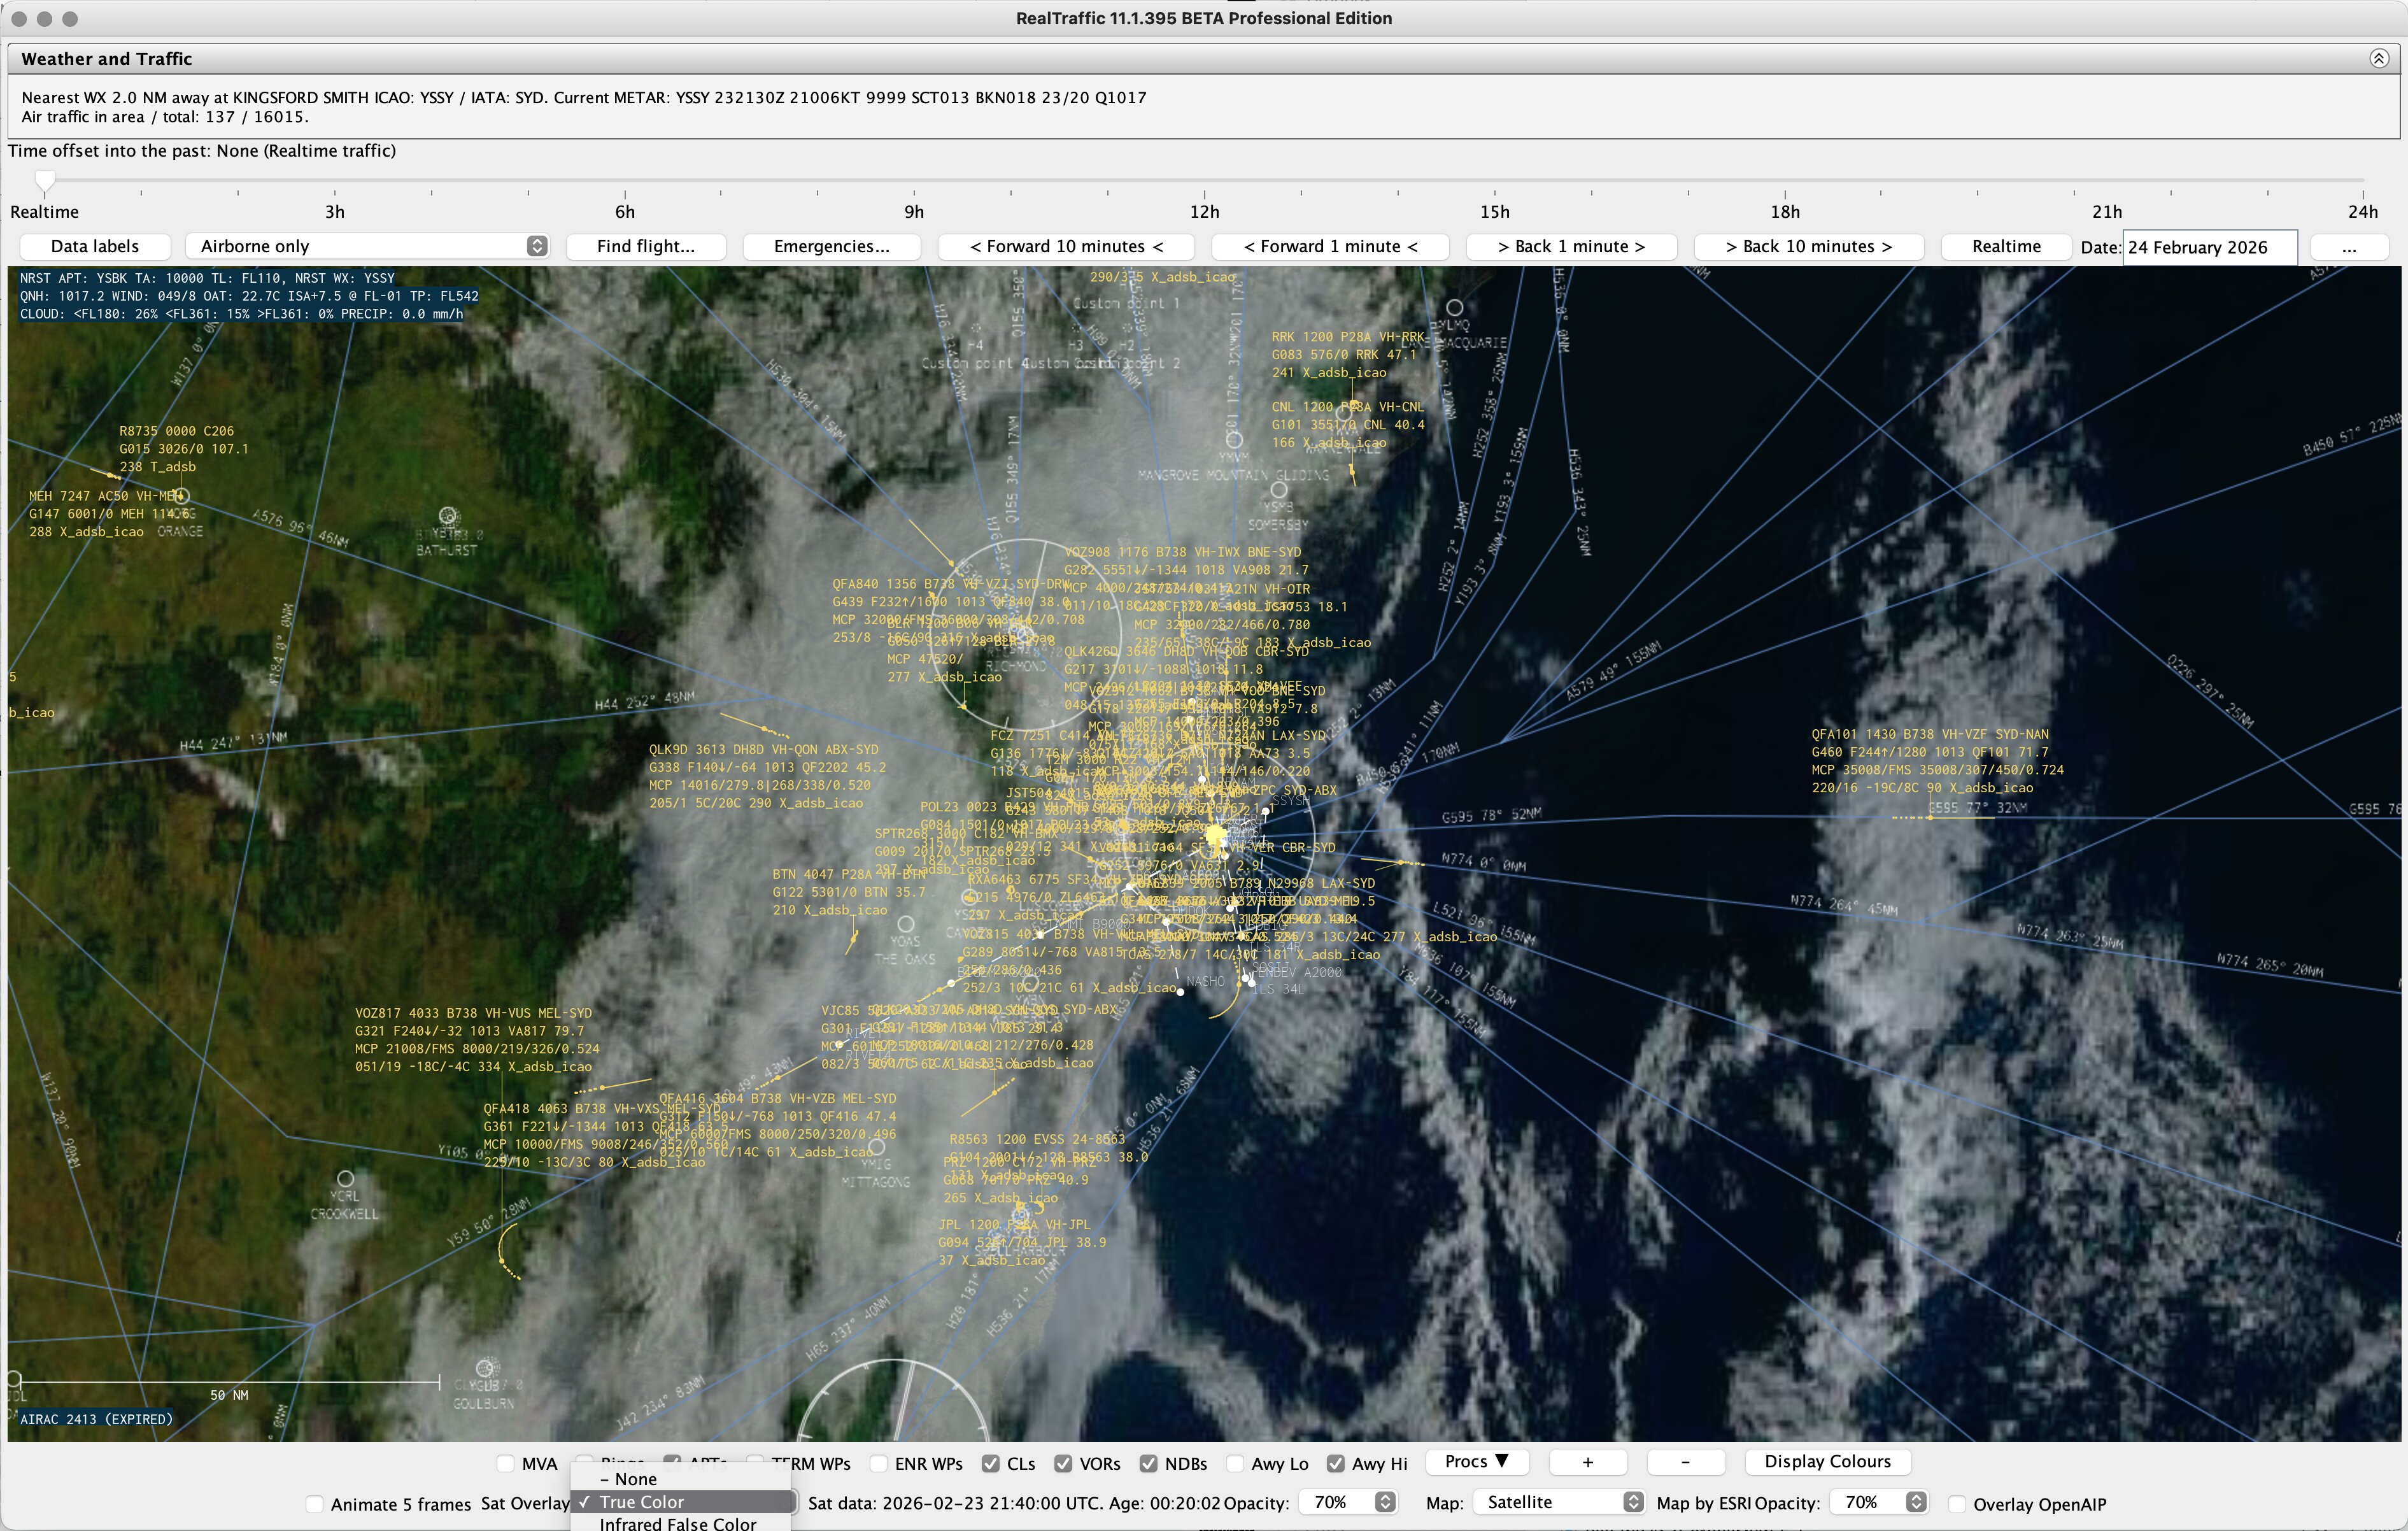
The main RealTraffic window in ATC mode, showing live traffic with navigation overlays, airways, and data labels.
The RealTraffic window is organized into distinct zones from top to bottom:
Menu Bar
Menu
Item
Action
File
Save Settings
Save all current settings to disk
Exit
Quit the application
Settings
Standard Settings…
Simulator connection, operating mode, location
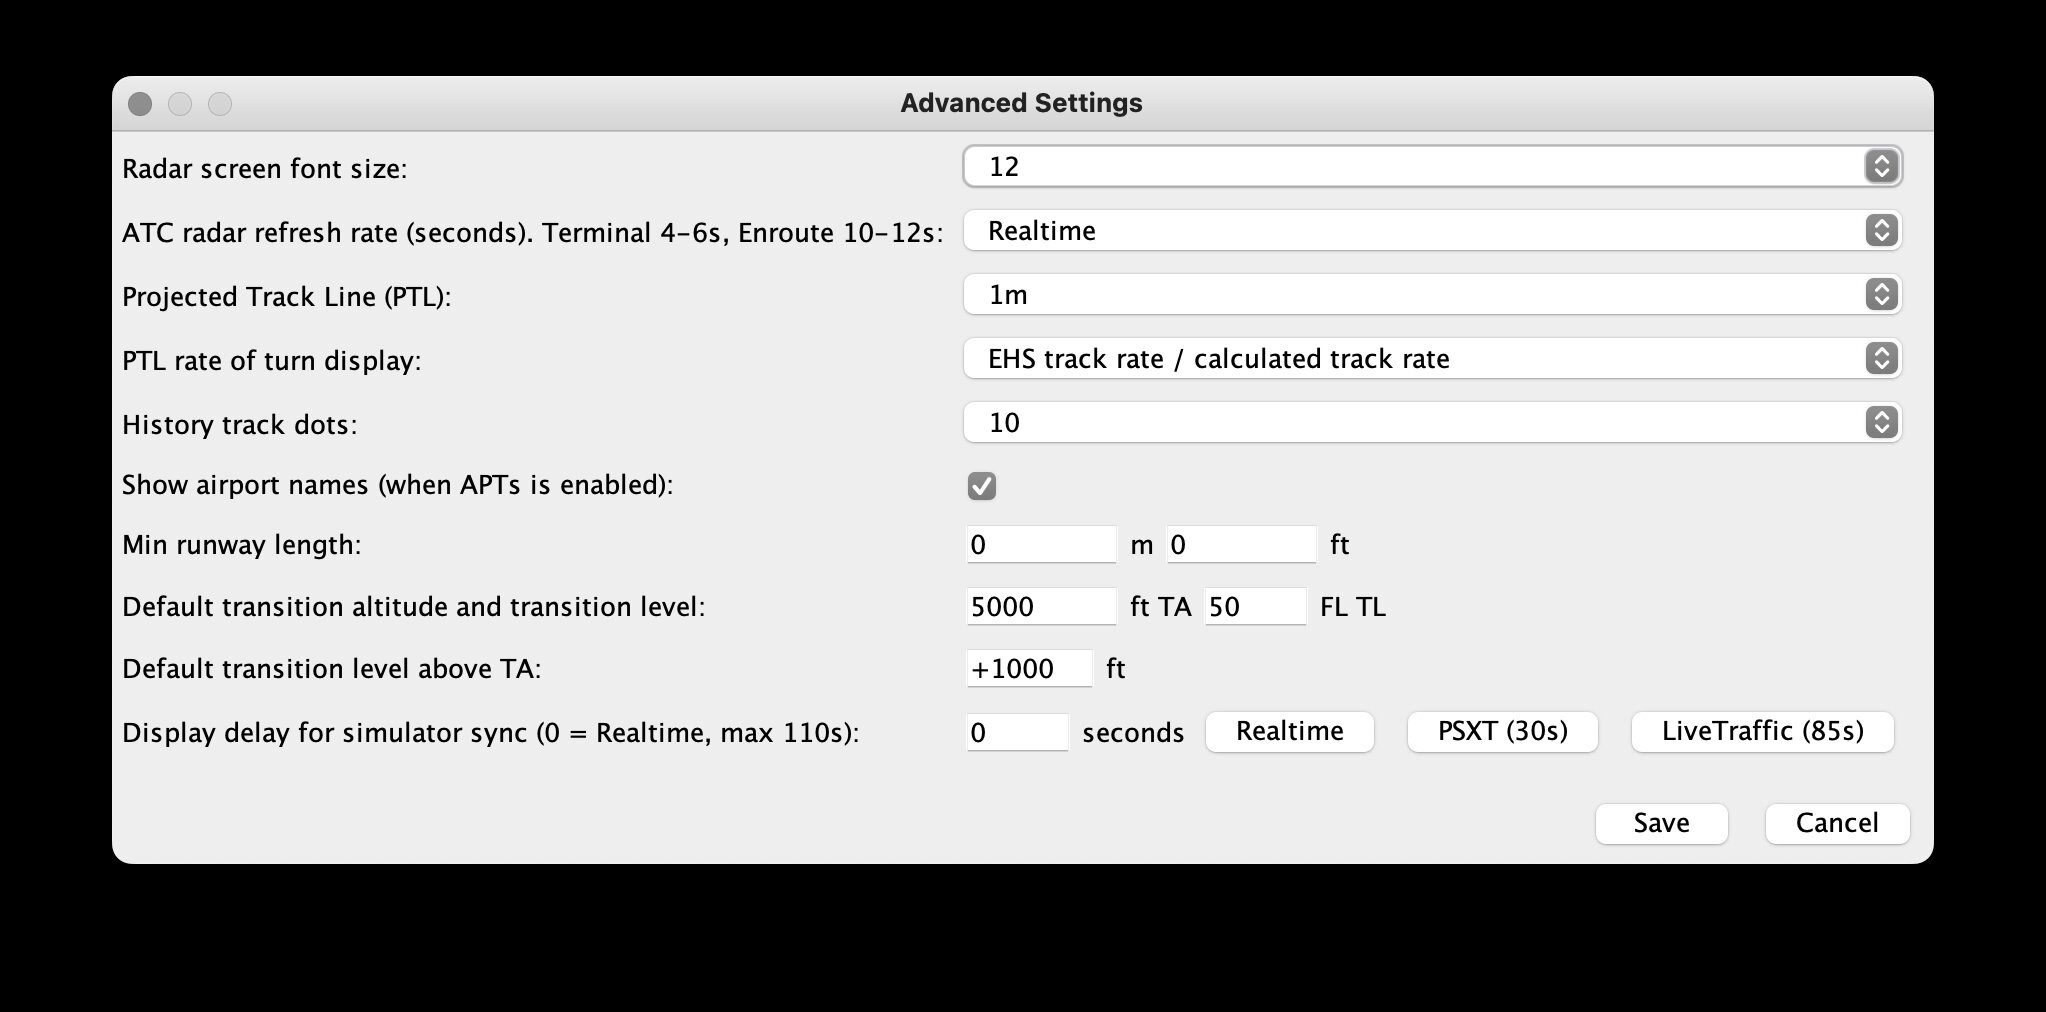
Advanced Settings…
Font size, radar refresh, PTL, history dots, display delay
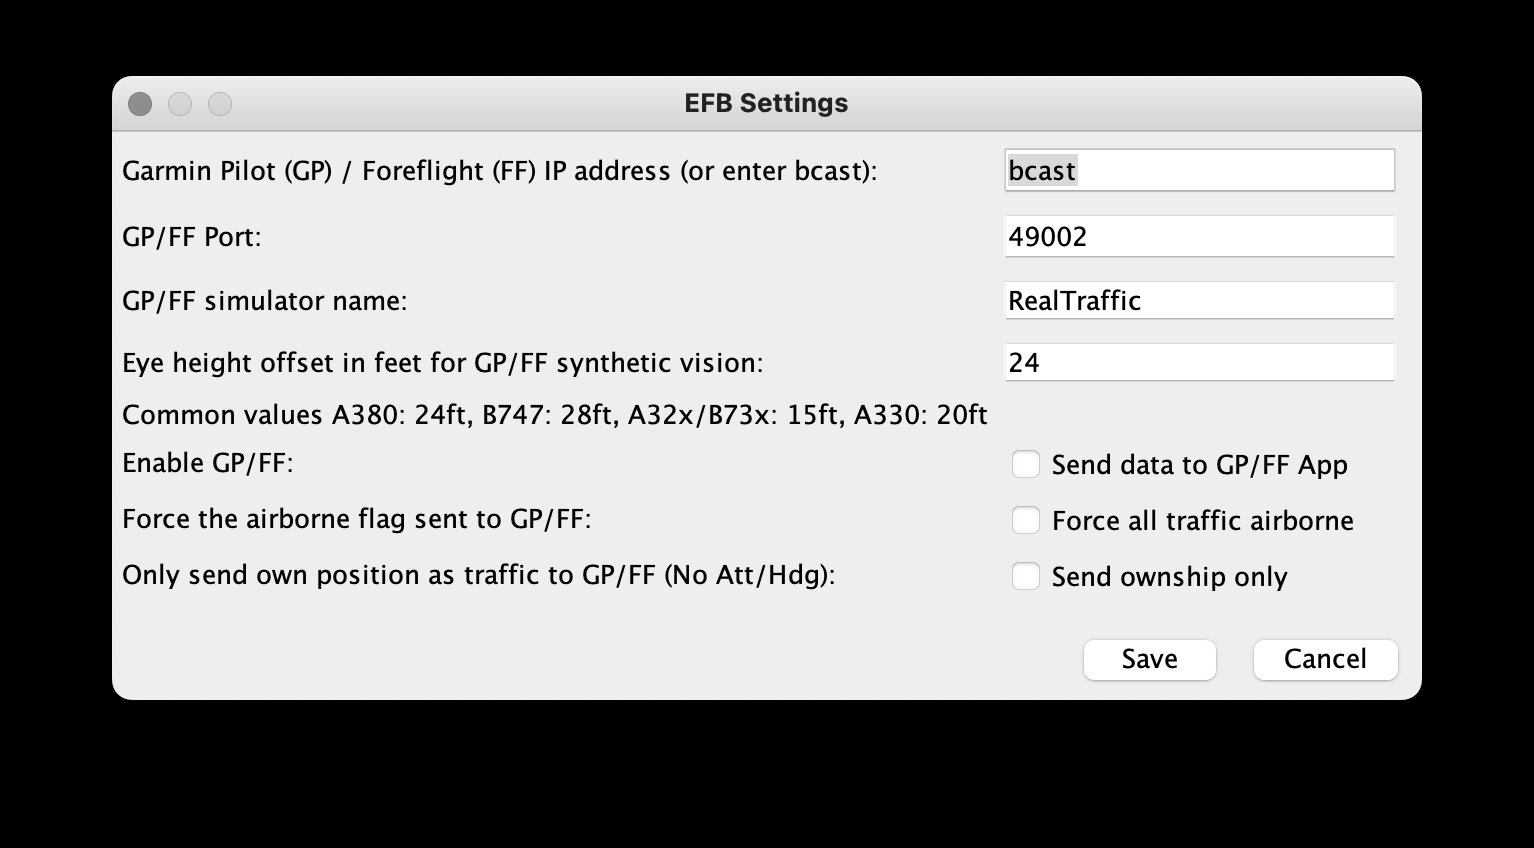
EFB Settings…
ForeFlight / Garmin Pilot configuration
Advanced Weather/Time…
Weather injection, SIGMETs, simulator time control
LAN Mode Settings…
Multi-instance networking on a LAN
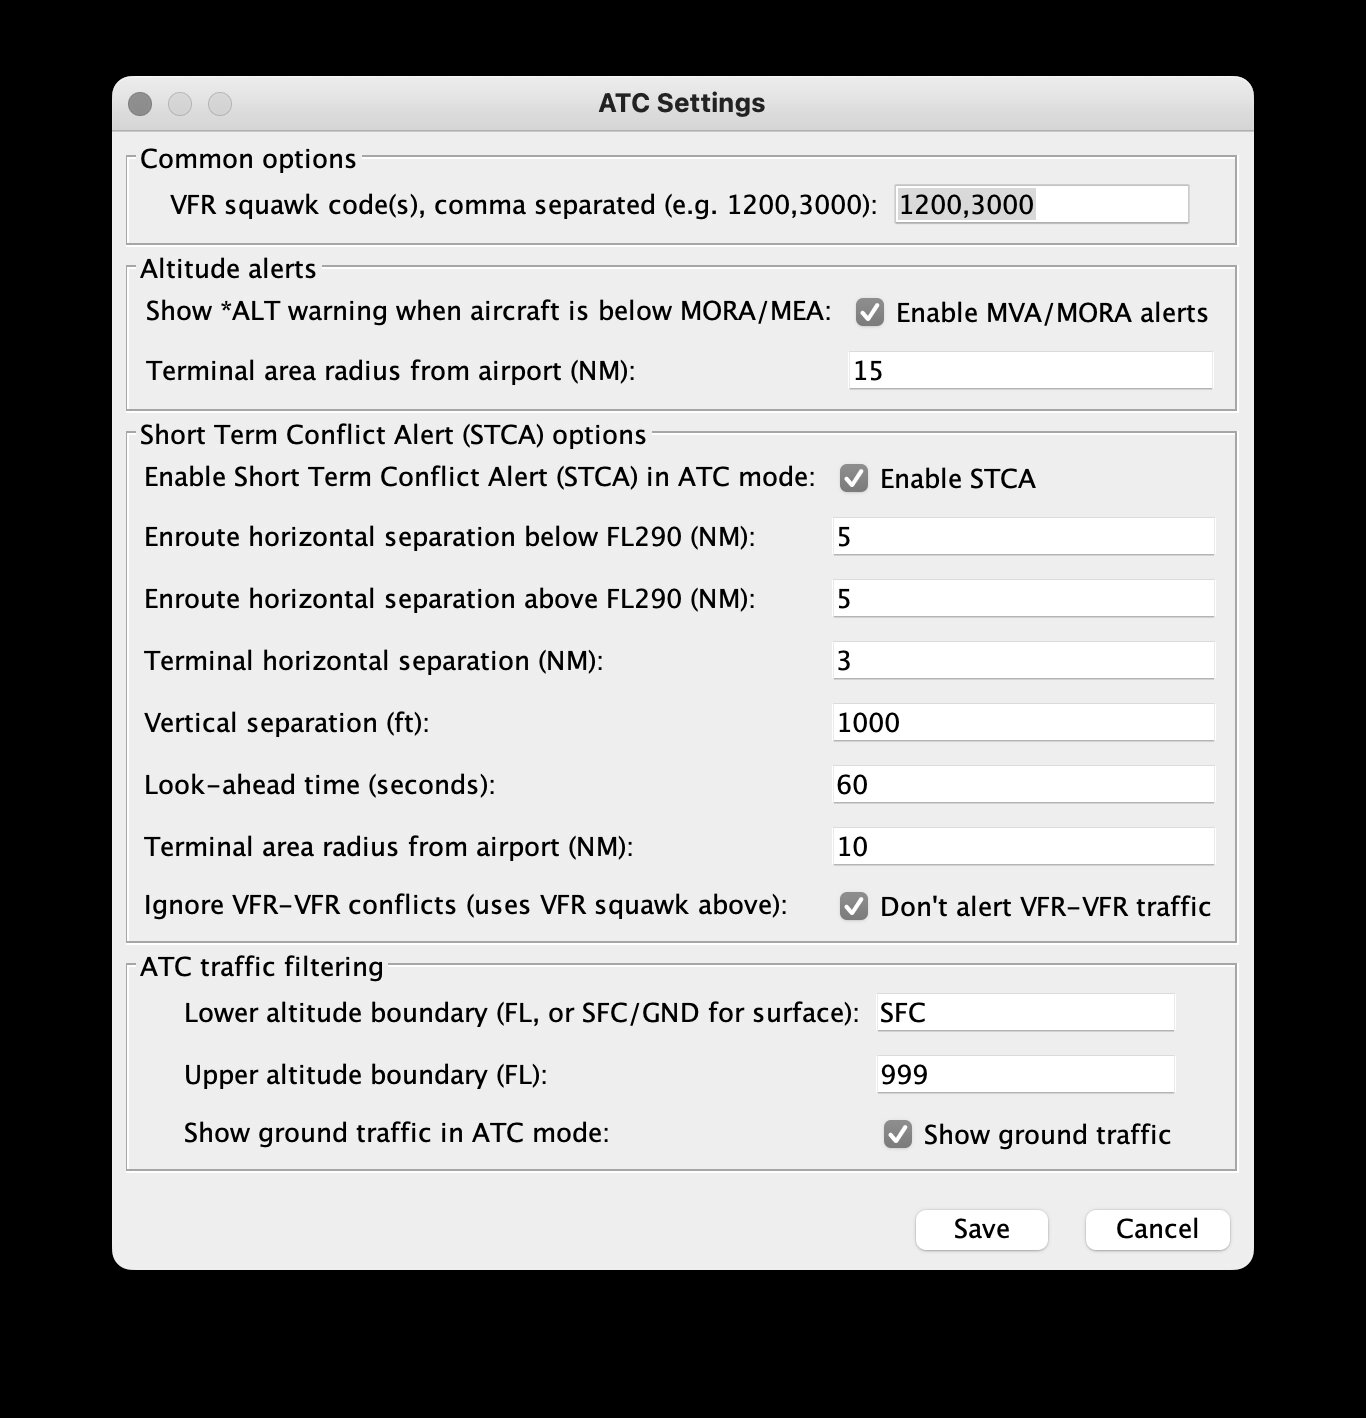
ATC Settings…
MVA/MORA alerts, STCA, altitude filtering
License…
Enter or update your license key
Settings Panel (collapsible)
The top area contains a collapsible Settings panel with a status label showing the current traffic count, connection state, and time information.
Time Controls Strip
A horizontal bar above the radar map containing the time offset slider, navigation buttons (Data Labels, Find Flight, Emergencies, time step buttons, Realtime, date picker), and label visibility controls. See Time Controls.
Radar Map Canvas
The central area is the radar display surface showing aircraft targets, navigation data, weather, and map tiles. This is where all interactive map operations take place (zooming, panning, clicking aircraft, etc.).
Navigation Overlay Strip
A bottom bar with checkboxes for toggling map overlays (MVA, Rings, APTs, waypoints, airways, etc.), zoom buttons (+ / -), and the Display Colours and Procs buttons.
Satellite / Map Strip
The lowest bar with satellite imagery type and opacity controls, OSM/map tile style selection, and the OpenAIP overlay checkbox.
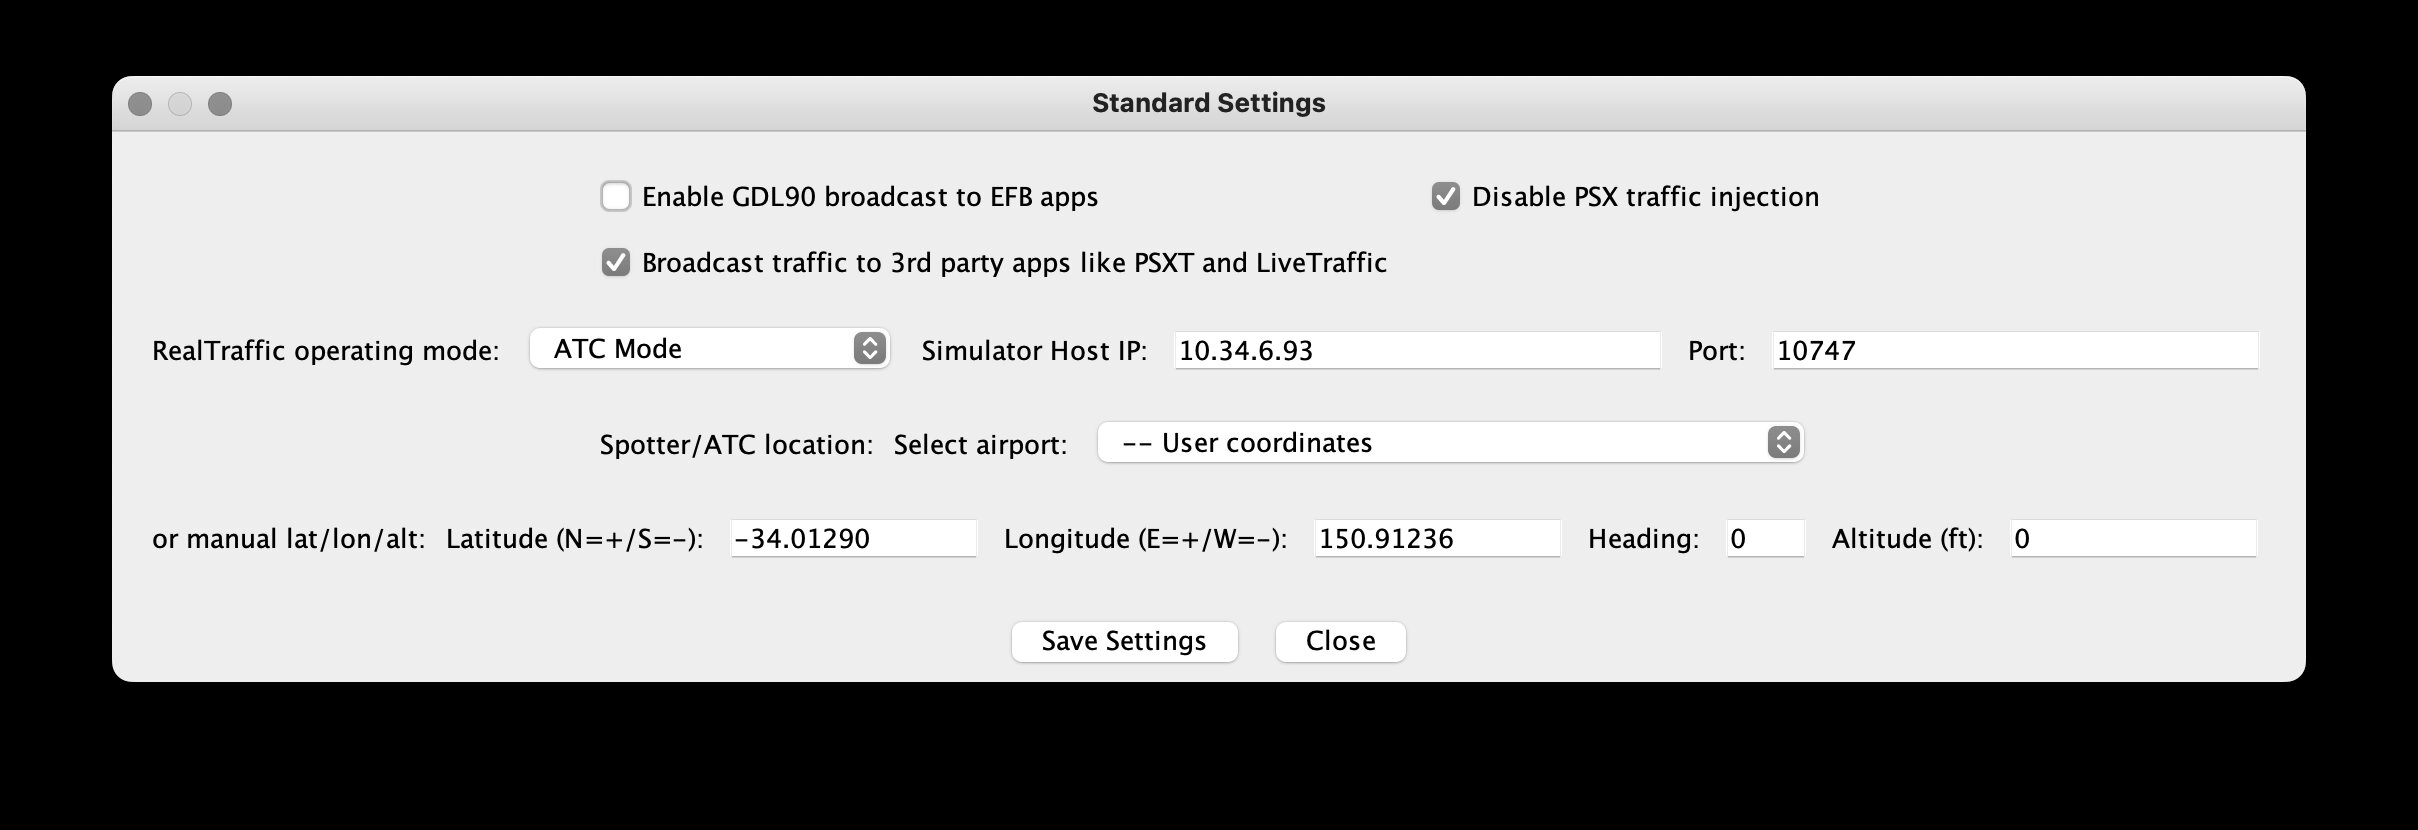
Open Settings > Standard Settings to configure the operating mode and simulator connection.
Standard Settings dialog — configure operating mode, simulator connection, and spotter/ATC location.
Operating Modes
The RealTraffic operating mode dropdown sets which simulator environment you are using:
Mode
Use Case
Display Delay
PSXT (P3D/FSX/MSFS)
Use with PSXT for Prepar3D, FSX, or MSFS. Traffic is broadcast via UDP for PSXT to inject.
0 s (PSXT handles its own buffering)
LiveTraffic
Use with the LiveTraffic plugin for X-Plane. Traffic is broadcast via UDP.
85 s
Aerowinx PSX
Direct TCP connection to Aerowinx PSX (Boeing 747 simulator).
0 s
Spotter Mode
No simulator—observe traffic from a fixed ground location.
0 s
ATC Mode
No simulator—ATC-style radar display from a fixed location with STCA and MVA alerts.
0 s
Host & Port
Simulator Host IP: The IP address or hostname of the machine running your simulator. Use localhost or 127.0.0.1 if the simulator is on the same machine.
Port: The TCP port for the simulator connection. Default is 10747.
Broadcast Options
Checkbox
Description
Enable GDL90 broadcast to EFB apps
Sends ADS-B traffic data to EFB apps (ForeFlight, Garmin Pilot, etc.)
Disable PSX traffic injection
Stops sending traffic to the simulator even when connected
Broadcast traffic to 3rd party apps like PSXT and LiveTraffic
Enables UDP broadcast of RTTFC traffic data on port 49005
In PSXT mode, the broadcast and injection checkboxes are pre-checked and locked, as PSXT requires them.
Display Delay
When using PSXT or LiveTraffic, the simulator buffers traffic before displaying it. RealTraffic can delay its own map display to match what the simulator shows. PSXT now handles its own buffering (0 s delay in RT), while LiveTraffic uses an 85-second delay. During the initial buffer fill, a red BUFFERING TRAFFIC, X SECONDS REMAINING countdown is shown.
Mouse wheel: Scroll up to zoom in, scroll down to zoom out.
Buttons: Click + or - in the navigation overlay strip.
Keyboard: Press + or - anywhere in the application.
The zoom range goes from 0.02 NM/pixel (extremely close) to 200 NM across the screen width. Step sizes adapt to the current zoom level—fine steps when zoomed in, larger steps when zoomed out.
Panning
Click and drag on the map to pan. The map follows the mouse cursor smoothly.
Aircraft Targets
Each aircraft is rendered as a directional symbol on the map with configurable data labels (see Aircraft Labels). The symbol rotates to match the aircraft's track. Parked and ground traffic use a distinct color.
Projected Track Line (PTL)
When enabled in Display Settings, a line extends ahead of each aircraft showing its projected position at 30 s, 1, 2, 4, or 8 minutes. The line can optionally curve based on the aircraft's rate of turn (from ADS-B Extended data or calculated from successive positions).
History Dots
Trailing dots show each aircraft's recent positions (5–20 dots, configurable in Display Settings).
Weather Overlay
The top-left corner of the map displays real-time weather data including the nearest airport, transition altitude/level, QNH, wind, temperature, ISA deviation, tropopause altitude, and cloud layers. See Weather Display.
The bottom navigation overlay strip provides checkboxes to toggle map layers from the navigation database:
The navigation overlay strip (top row) and satellite/map controls (bottom row) at the bottom of the window.
Checkbox
What It Shows
MVA
Minimum Vectoring Altitude grid. Useful in ATC mode. Triggers MORA/MVA altitude alerts when enabled.
Rings
Range rings centered on your position (default: on).
APTs
Airports from the navigation database, filtered by minimum runway length.
TERM WPs
Terminal waypoints. Triangles for conventional waypoints, filled for RNAV waypoints.
ENR WPs
Enroute waypoints.
CLs
Extended runway centerlines.
VORs
VOR, VORTAC, and TACAN navaids with frequency labels.
NDBs
NDB navaids with frequency labels.
Awy Lo
Low-altitude airways.
Awy Hi
High-altitude airways.
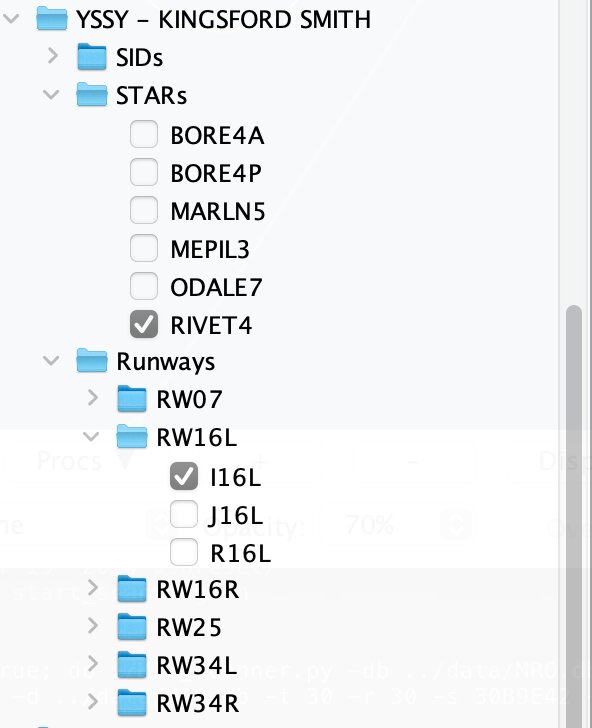
Procedures (Procs Button)
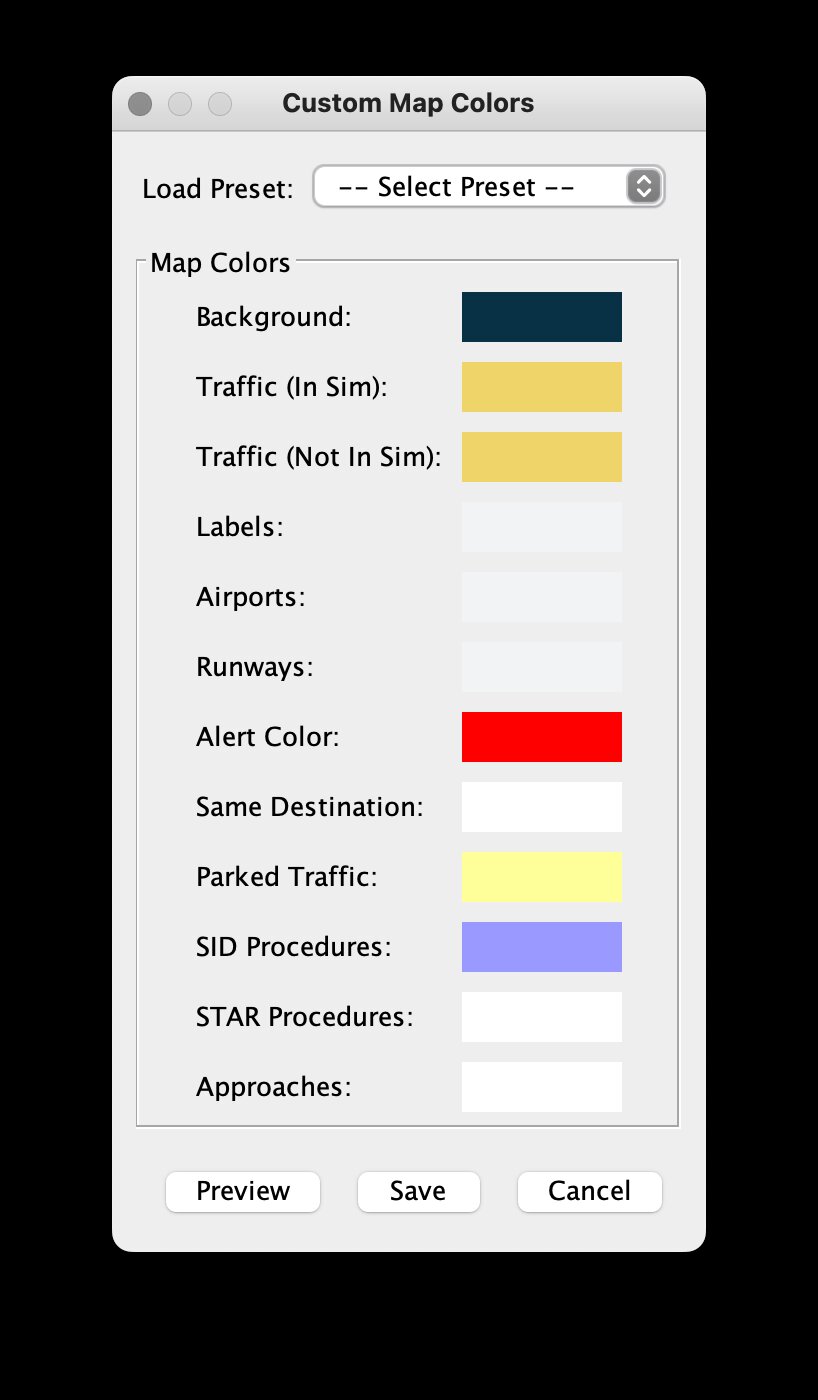
Click the Procs button to open a tree panel where you can toggle individual SID, STAR, and Approach procedures per airport. Each procedure is drawn as a line on the map showing the lateral flight path with waypoint labels. Procedures use distinct colors (configurable via Display Colours).
The Procedures tree panel for YSSY, showing SIDs, STARs, and per-runway approach procedures. Check a procedure to draw it on the map.
You can also toggle individual approach procedures by clicking on an airport on the map—see Airport Info Panel.
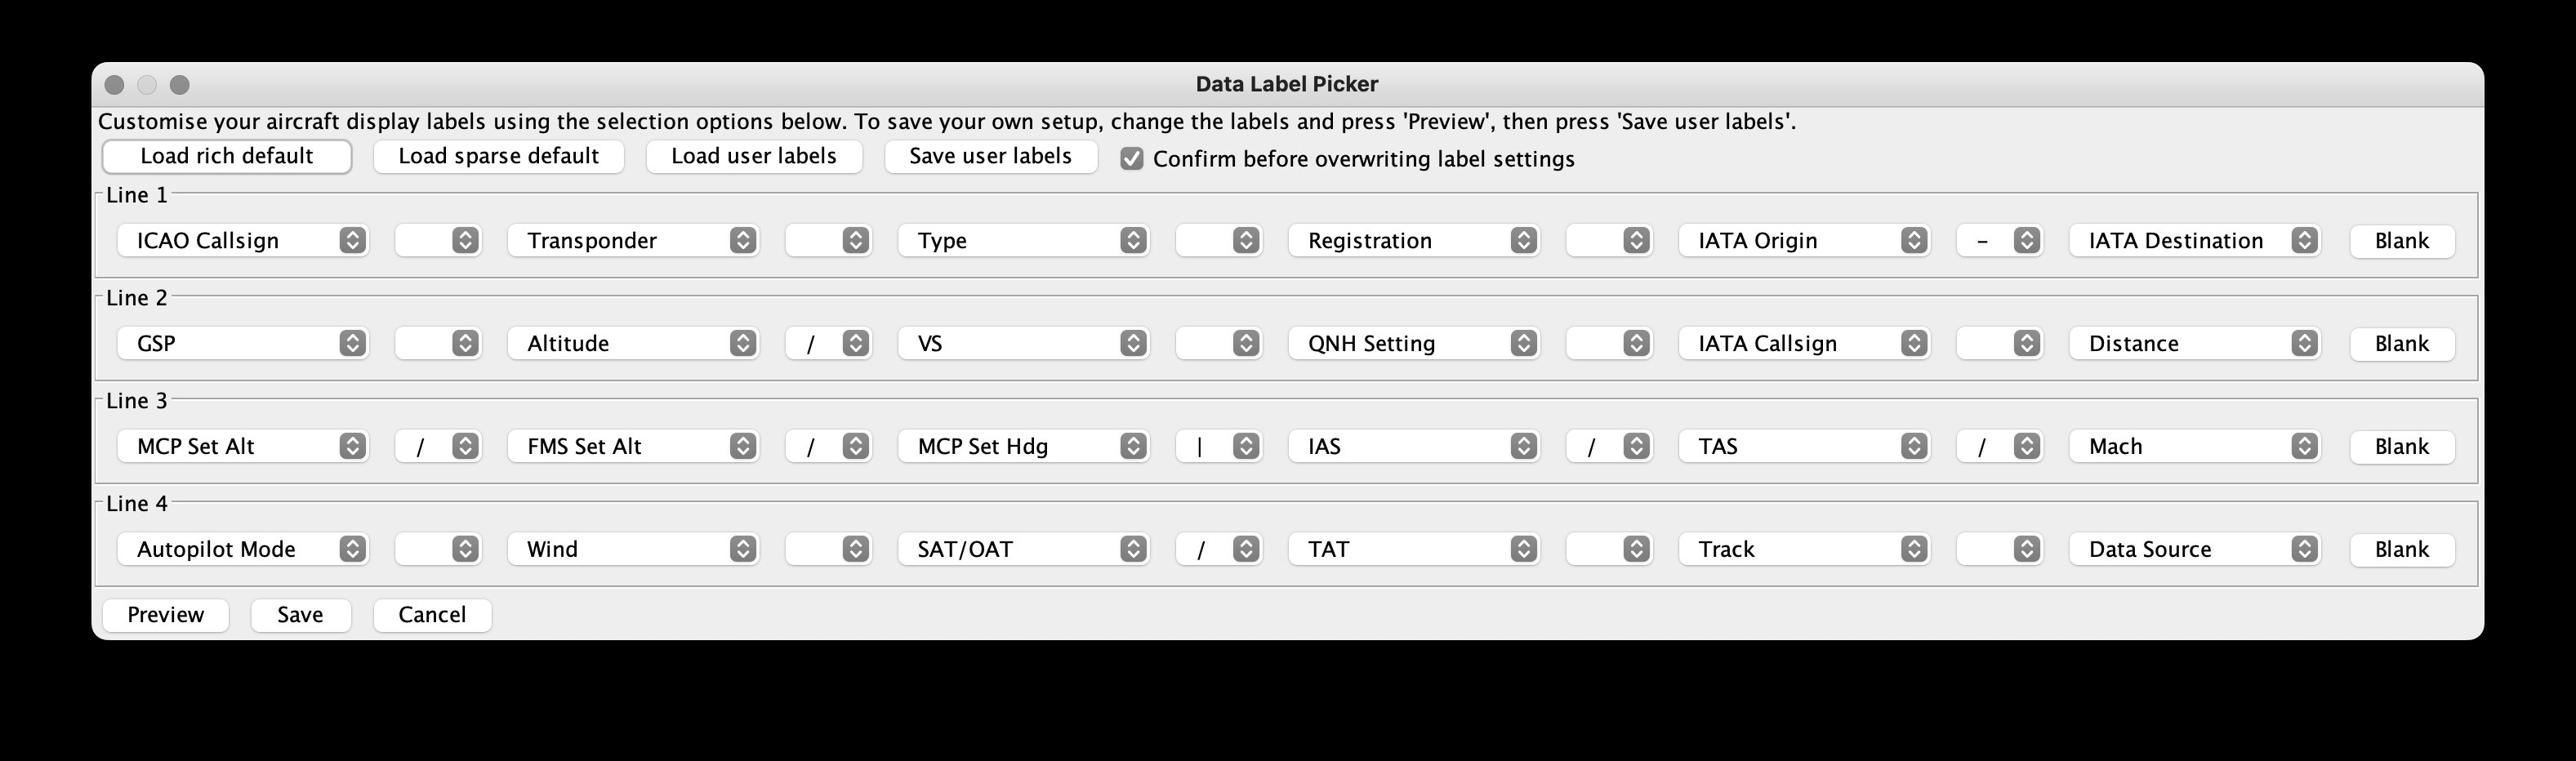
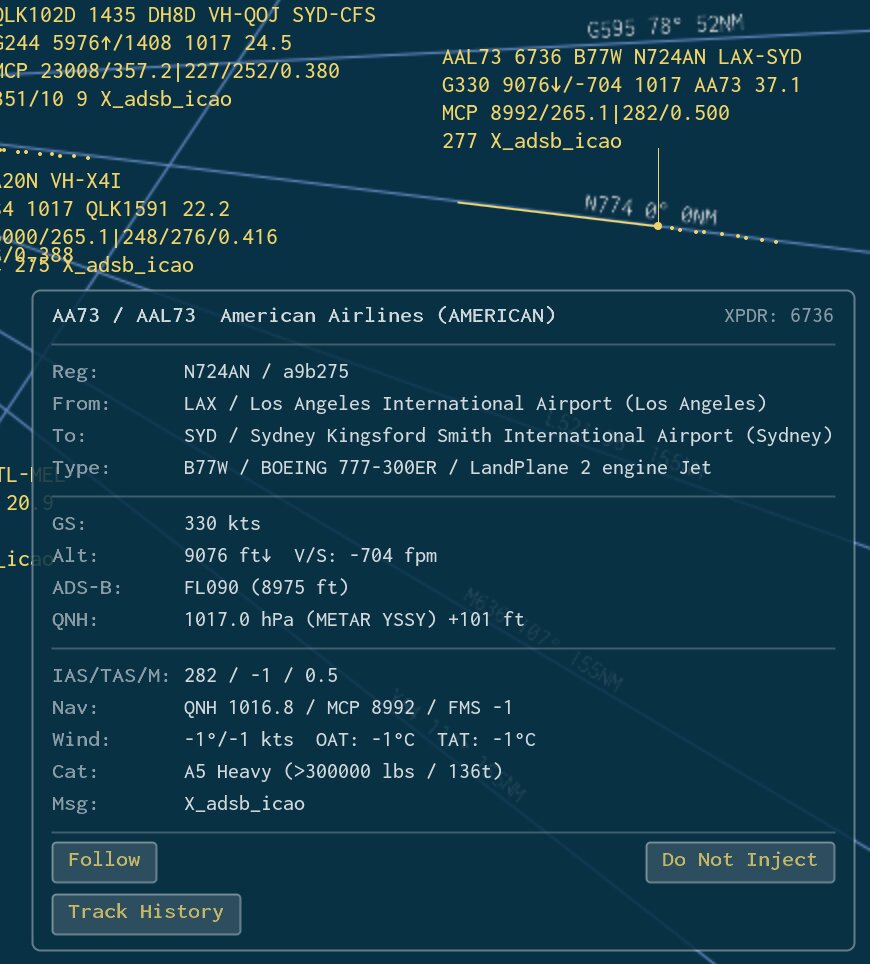
Each aircraft on the map displays a multi-line data label. Labels are fully customizable using the Data Labels button in the time controls strip.
The Data Label Picker — configure up to 4 lines of 6 data fields each, with divider characters between them.
Label Layout
Labels have 4 lines, each with up to 6 data fields and 5 divider characters between them. This gives you great flexibility in arranging what data is shown.
Available Data Fields
Field
Description
Altitude
Corrected altitude (ft or flight level)
Autopilot Mode
Active AP modes (althold, lnav, vnav, etc.)
Distance
Distance from your position
Emergency
Emergency status indicator
FMS Set Alt
FMS target altitude
GSP
Ground speed (knots)
HDG (M) / HDG (T)
Magnetic or true heading
HexID
ICAO 24-bit hex address
IAS / TAS / Mach
Indicated, true airspeed, Mach number
IATA/ICAO Callsign
Flight callsign (IATA or ICAO format)
IATA/ICAO Origin
Departure airport code
IATA/ICAO Destination
Arrival airport code
MCP Set Alt / Hdg
MCP selected altitude and heading
QNH Setting
Altimeter setting
Registration
Aircraft tail number
SAT/OAT / TAT
Static / total air temperature
Signal RSSI
ADS-B signal strength
Track
Track angle over ground
Transponder
Squawk code
Type
ICAO aircraft type code
VS
Vertical speed (fpm)
Wind
Wind direction and speed
Data Source
Source of ADS-B data
Divider Characters
Between fields you can place a divider: space, /, -, |, (, or ).
Presets
Load rich default — A comprehensive label layout with callsign, heading, speed, altitude, wind, and more.
Load sparse default — A minimal layout showing just callsign, speed, altitude, and distance.
Save / Load user labels — Save your custom layout and restore it later.
Click Preview to see changes immediately without closing the dialog, or Save to confirm.
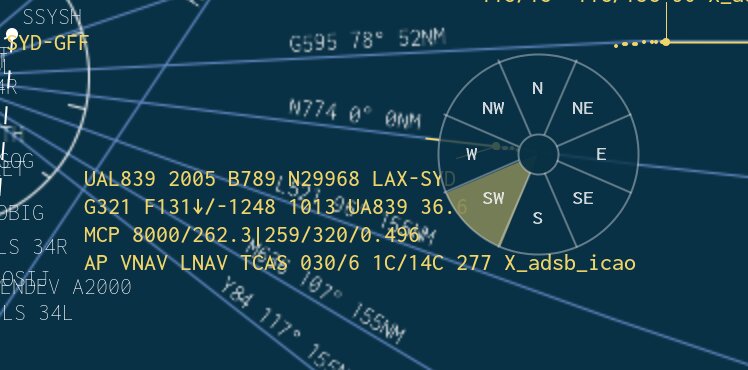
Label Positioning
By default, labels appear in a standard position relative to the aircraft symbol. You can reposition labels in two ways:
Right-click an aircraft: A label picker ring appears with 8 directional positions (N, NE, E, SE, S, SW, W, NW). Click the desired quadrant to lock the label there.
Left-drag a label: Freely position the label by dragging it to any location on the map.
Right-click an aircraft to show the 8-way label position picker. The highlighted quadrant (SW in this example) is where the label will be placed.
Label Visibility
The label visibility dropdown in the time controls strip filters which labels are shown:
Show all — All aircraft labels visible
Airborne only — Hide labels for ground traffic
Ground only — Hide labels for airborne traffic
Hide all — No labels shown
Only traffic to/from my destination — Show labels only for traffic sharing your destination
±3000ft of my altitude — Show labels only for traffic within 3000 ft of your altitude
Left-click on an airport, VOR, NDB, or waypoint symbol on the map (when no aircraft is nearby) to open its info panel.
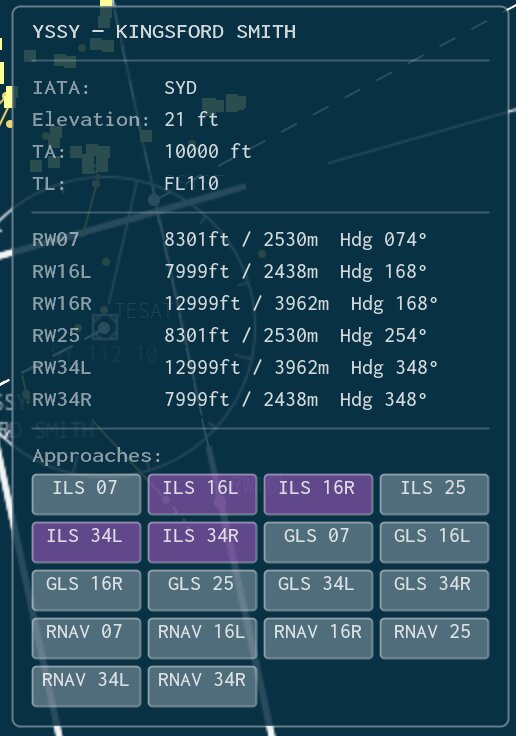
Airport info panel for YSSY — shows elevation, transition altitude/level, runway dimensions, and clickable approach procedure buttons. Active approaches are highlighted.
Airport Info
For airports, the panel shows:
Airport ICAO code and full name
Runway information including length (in feet and meters)
Available approach procedures, each clickable to toggle on/off
When you click an approach procedure, its lateral path is drawn on the map with waypoint labels. Click it again to hide it.
Navaid Info
For VORs, NDBs, and waypoints, the panel displays the identifier, name, frequency (where applicable), and coordinates.
The time controls strip appears above the radar map when connected to the RealTraffic server. Time offset features require a Professional license.
Time Offset Slider
A horizontal slider ranging from 0 to 1440 minutes (24 hours), allowing you to view historical traffic up to 24 hours in the past. Tick marks appear at 60-minute intervals with labels every 3 hours.
The label above the slider shows:
At zero: "Time offset into the past: None (Realtime traffic)"
When offset: "Offset: X hours Y minutes. Traffic and weather at YYYY-MM-DD HH:MM:SS UTC / LT"
Time Step Buttons
Button
Action
< Forward 10 minutes <
Move 10 minutes toward the present
< Forward 1 minute <
Move 1 minute toward the present
> Back 1 minute >
Move 1 minute into the past
> Back 10 minutes >
Move 10 minutes into the past
Realtime
Reset to live traffic (clear all time offset)
Date Picker
A calendar date picker that lets you select a specific date to view historical traffic from. Standard license users are restricted to today's date only.
Simulator-Controlled Time
In Settings > Advanced Weather/Time, you can enable Simulator controls time offset. When checked, PSX sends time offset commands and the manual slider and buttons are disabled.
Click Find flight… to open the search window. You can search for aircraft worldwide using any of these fields:
Callsign
From (departure airport)
To (destination airport)
Type (ICAO aircraft type code)
Tail (registration)
XPDR (transponder/squawk code)
HexID (ICAO 24-bit address)
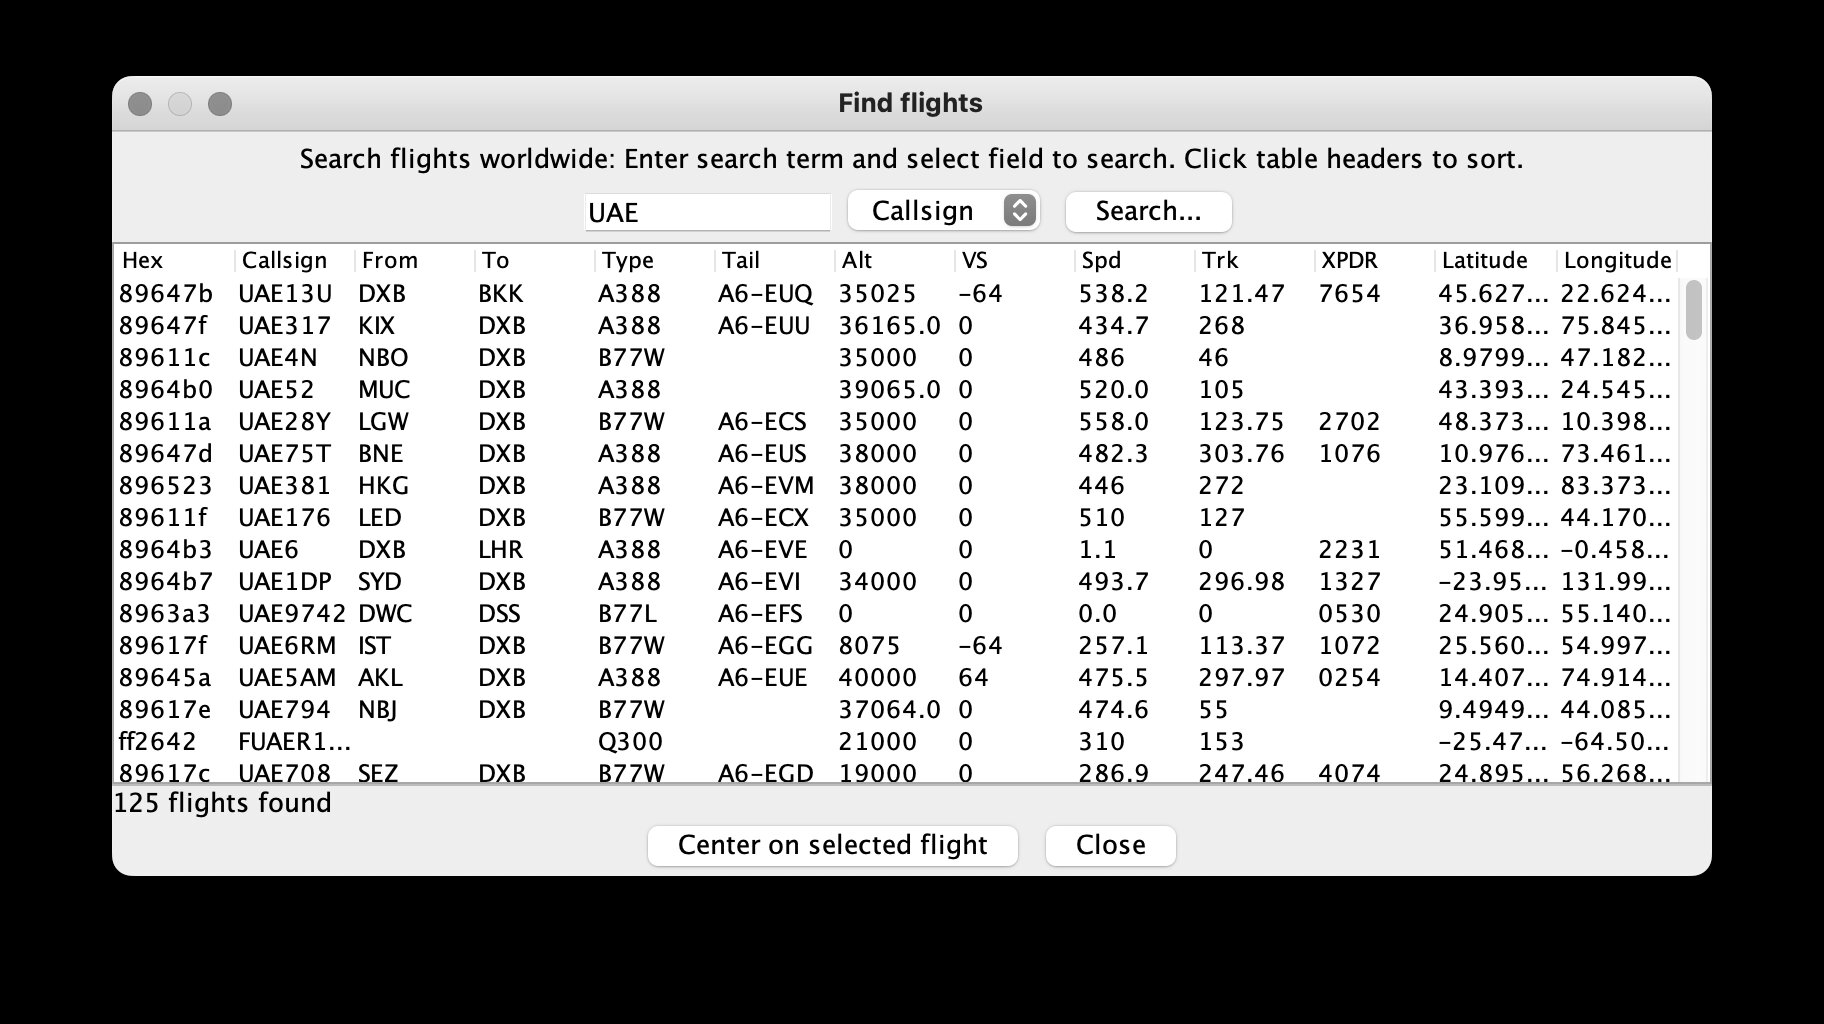
Enter your search term, select the field to search, and click Search. Results appear in a sortable table showing:
Hex | Callsign | From | To | Type | Tail | Alt | VS | Spd | Trk | XPDR | Latitude | Longitude
The Find Flights window — searching for flights by callsign with sortable results. Click "Center on selected flight" to jump to an aircraft.
The result count is displayed below the table.
In Spotter Mode or ATC Mode, select a result and click Center on selected flight to jump the map to that aircraft's position.
Emergency Window
Click Emergencies… to open the emergency tracking window. It displays aircraft currently squawking emergency transponder codes:
Code
Meaning
7700
General emergency
7600
Loss of radio communication
7500
Unlawful interference (hijack)
The window has two sections:
Current Emergencies
A live table showing all aircraft currently squawking an emergency code, with columns for hex ID, callsign, origin, destination, type, tail, altitude, vertical speed, speed, track, transponder code, and position.
On the map, aircraft with emergency codes are tagged with *EM in their label.
Emergency History (Last 7 Days)
A historical log showing past emergencies with start/end times and duration. Ongoing emergencies show "Ongoing" in the end-time column.
The Center on selected flight button (Spotter/ATC Mode only) can jump the map to a current emergency, or for historical entries, fetch the last known position and set the time offset to when the emergency occurred.
The bottom satellite/map strip provides controls for layering imagery over the radar display.
Satellite Imagery (Pro License)
Select a satellite overlay from the dropdown:
Type
Description
True Color
Natural-color satellite imagery
Infrared False Color
Infrared imagery for cloud top temperature analysis
PWV False Color
Precipitable Water Vapor imagery
Radar
Precipitation radar composite
Opacity: Adjust from 10% to 100% in 10% steps.
Animate: Check Animate 5 frames to cycle through the 5 most recent satellite images as an animation, showing weather movement over time.
The status label shows the satellite data timestamp and age.
Infrared False Color satellite weather overlay showing real-time cloud formations and weather systems.
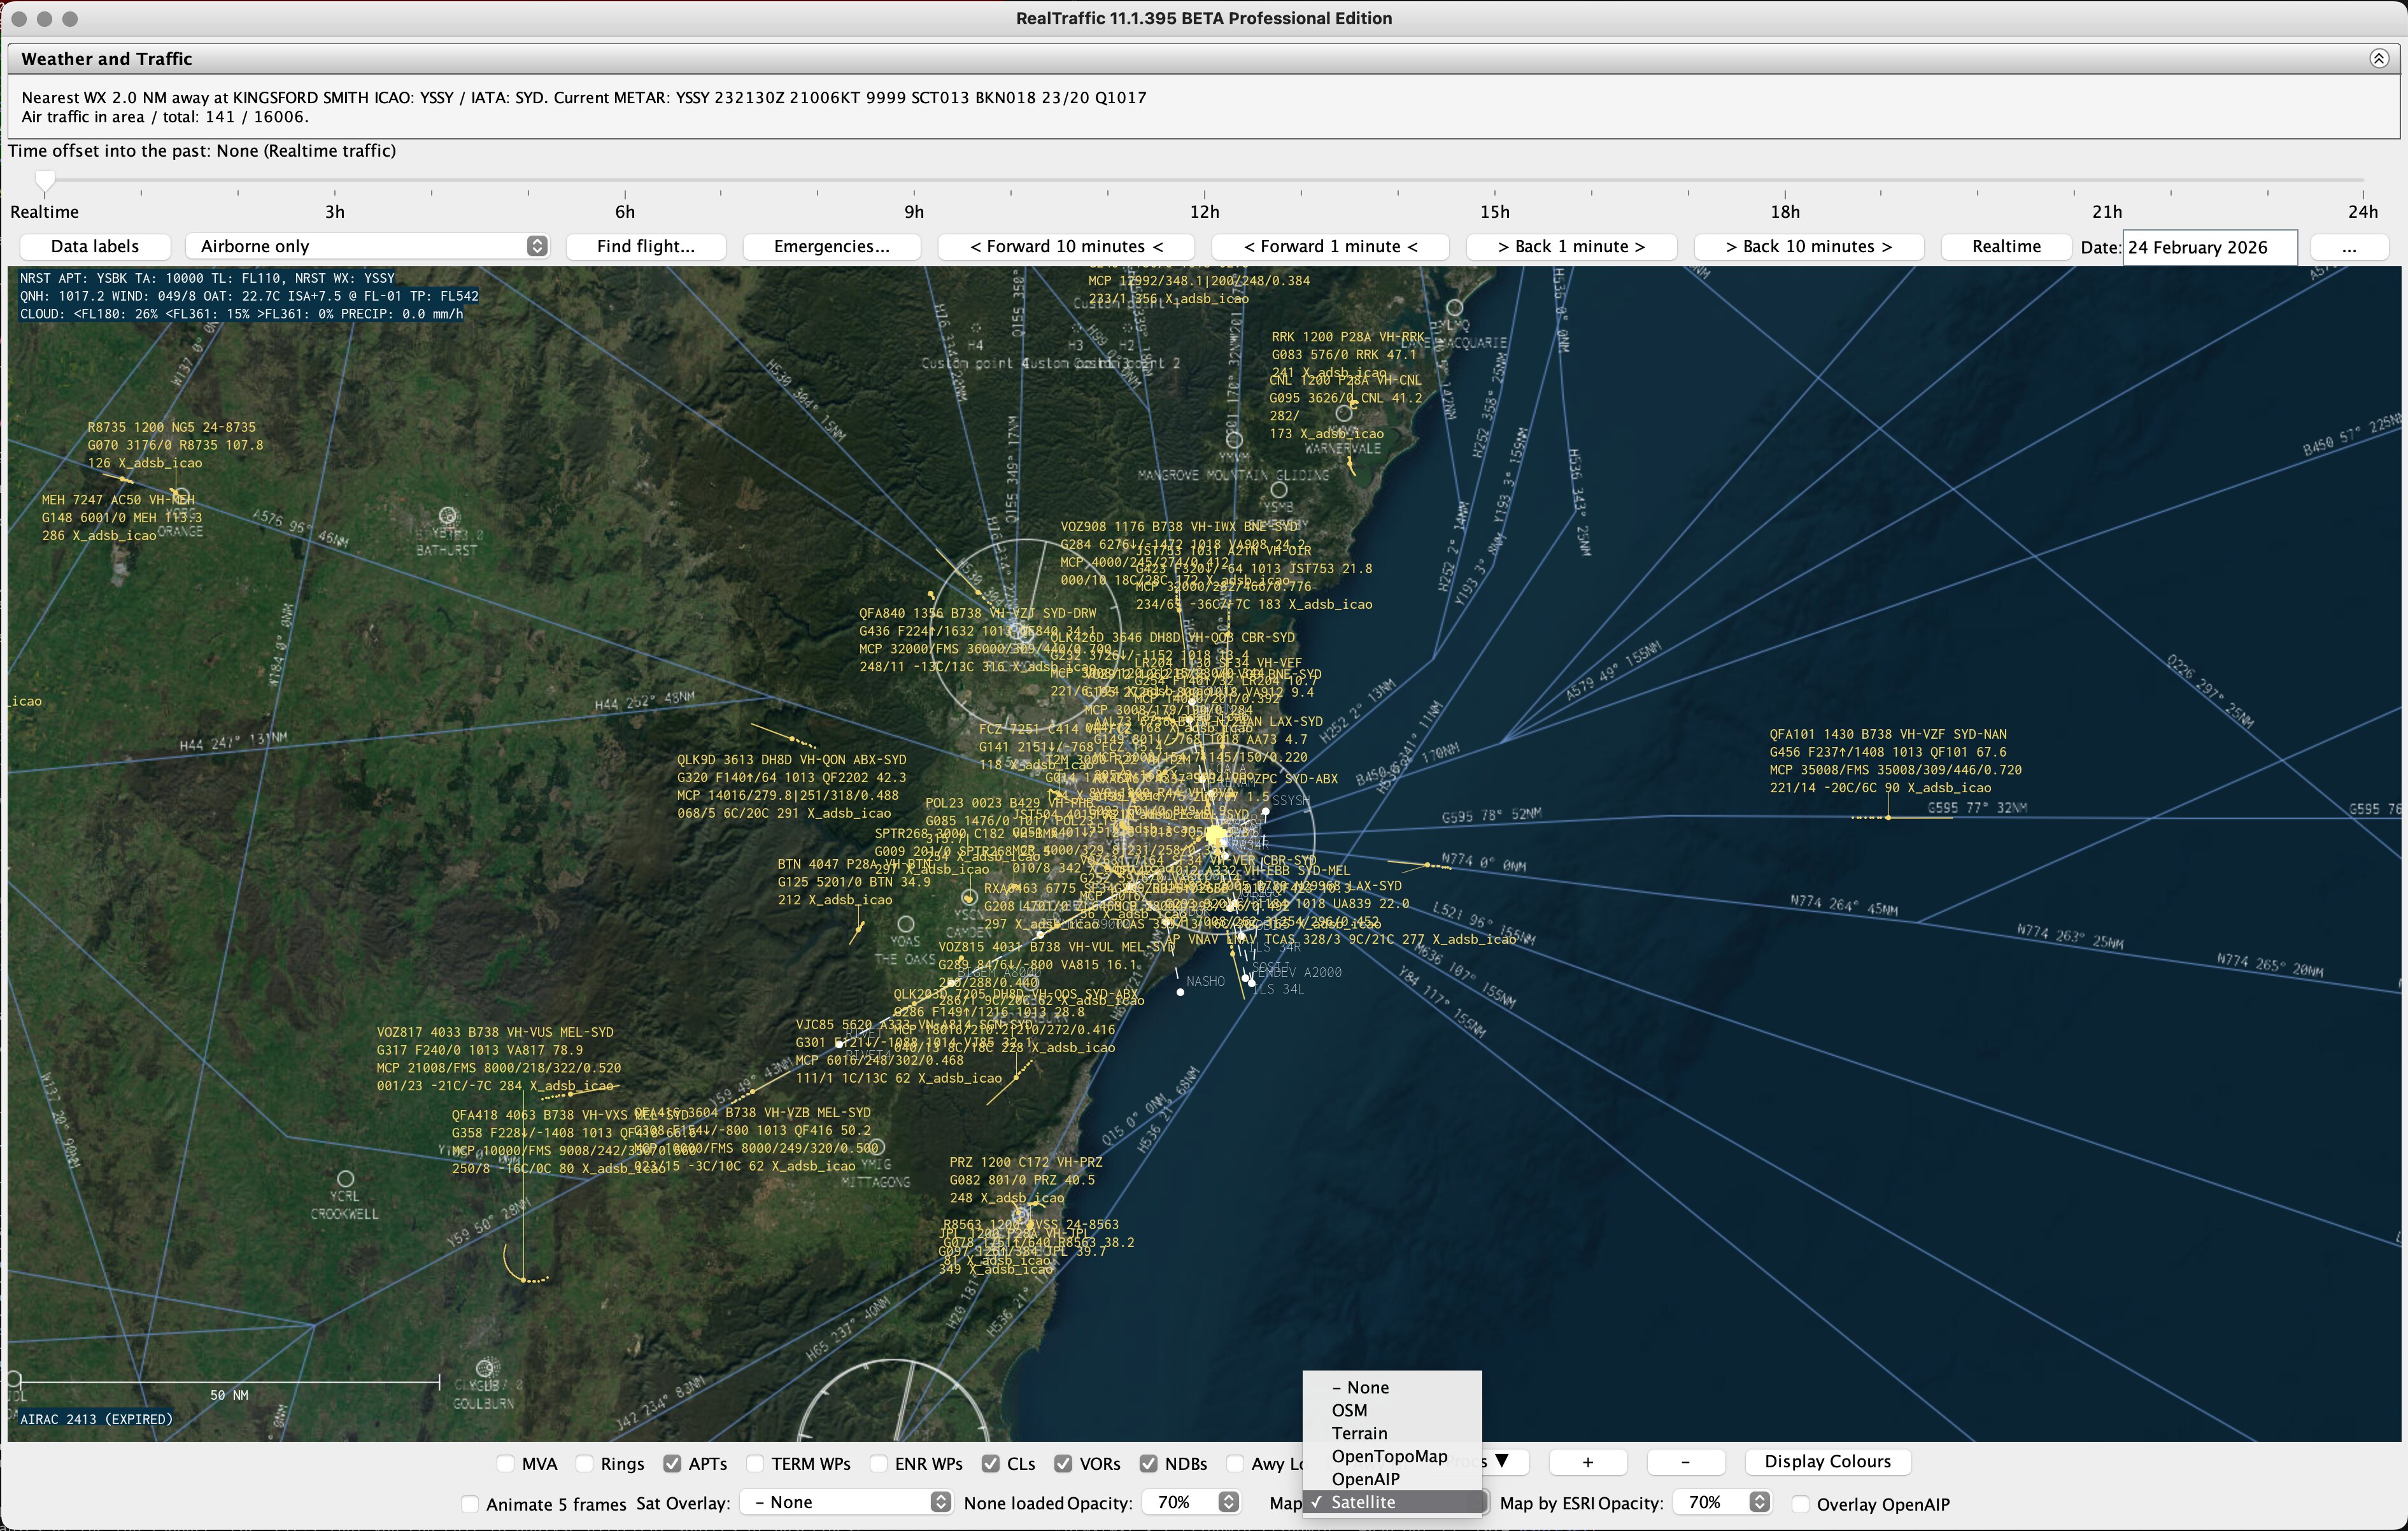
Map Tiles
Select a map tile style from the dropdown:
Style
Description
OSM
OpenStreetMap standard tiles
Terrain
Terrain/topographic style map
OpenTopoMap
Detailed topographic map
OpenAIP
Aviation-specific chart data (airspace, frequencies)
Satellite
Satellite imagery tiles
Opacity: Adjust from 10% to 100% (default: 70%).
A progress label shows "Loading..." while tiles are being fetched.
Satellite map tile background with traffic overlay — the Map dropdown in the bottom bar selects the tile style.
OpenAIP Overlay
Check Overlay OpenAIP to layer OpenAIP aviation chart data on top of the selected map style. This adds airspace boundaries, frequencies, and other aviation-specific features. The checkbox is disabled when no map style is selected or when OpenAIP is already the selected style.
NRST APT: Nearest airport and its transition altitude (TA) and level (TL)
NRST WX: Nearest METAR-reporting station
QNH: Local altimeter setting (from nearest METAR or GFS model)
WIND: Wind direction/speed at your altitude
OAT: Outside air temperature and ISA deviation
TP: Tropopause altitude
CLOUD: Cloud cover at three altitude bands (low, mid, high) with percentages
PRECIP: Precipitation rate in mm/h
QNH Altitude Correction
RealTraffic corrects aircraft pressure altitudes using local QNH data. The correction source is shown in the aircraft detail panel:
METAR source: Uses the nearest airport's METAR QNH (most accurate)
GFS source: Falls back to GFS model QNH when no nearby METAR is available
No correction (STD): Standard pressure (1013.25 hPa) when no QNH data exists
Weather Injection
In Settings > Advanced Weather/Time, you can enable weather injection and SIGMET forwarding to the simulator:
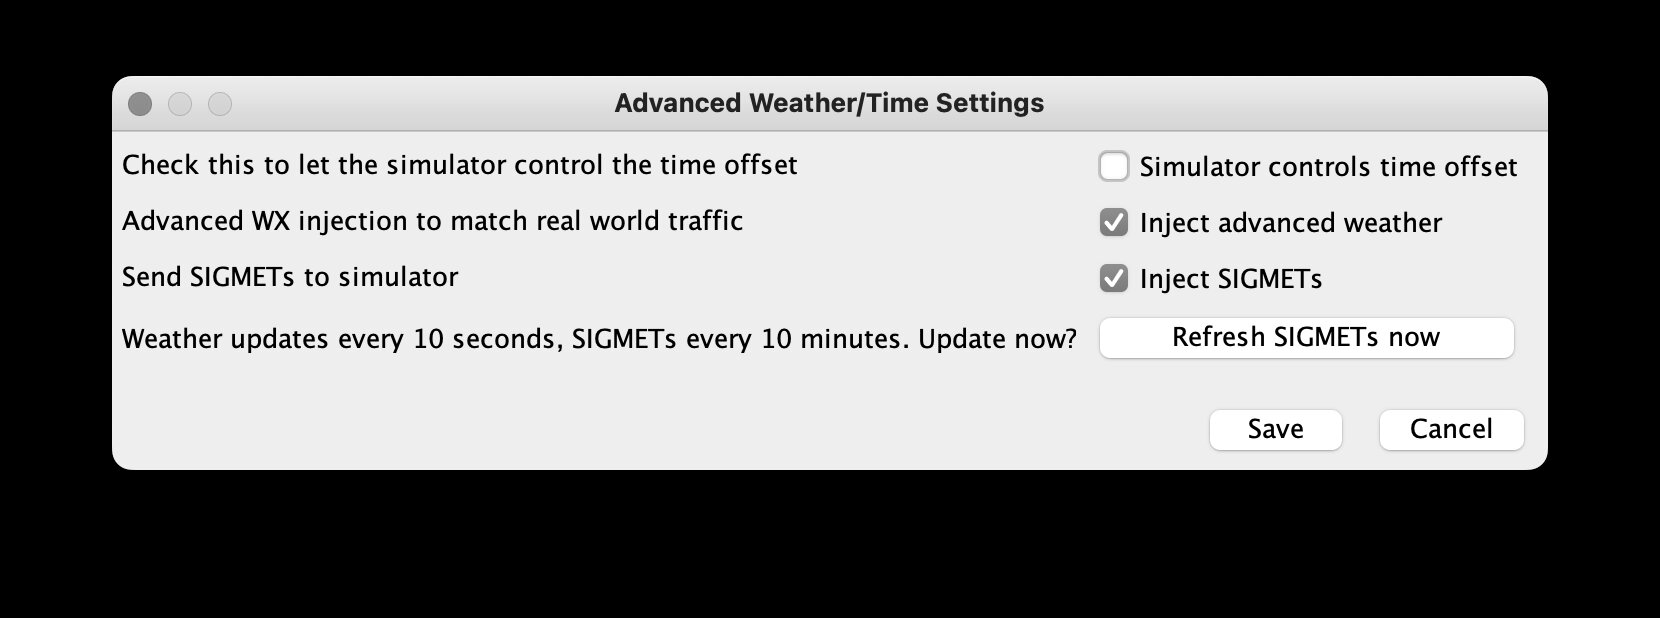
Advanced Weather/Time Settings — configure simulator time control, weather injection, and SIGMET forwarding.
Options:
Inject advanced weather (PSX and LiveTraffic only): Sends real-world weather parameters (winds, temperature, pressure, visibility) to the connected simulator so the simulated weather matches the real traffic.
Inject SIGMETs (PSX only): Forwards SIGMET (Significant Meteorological Information) data to the simulator. SIGMETs are fetched from the server every 10 minutes. Click Refresh SIGMETs now to force an immediate update.
MSFS 2024 uses its own live weather engine. When flying within 24 hours of real time, MSFS 2024 should have roughly correct weather conditions without needing weather injection from RealTraffic.
Weather Broadcast
Full weather data (QNH, METAR, local weather model) is broadcast via UDP on port 49004 every 10 seconds, for use by third-party applications.
Spotter Mode and ATC Mode allow you to observe traffic from a fixed ground location without a connected simulator.
Setting Up
In Standard Settings, set the operating mode to Spotter Mode or ATC Mode.
Select an airport from the Spotter/ATC location dropdown. Type a letter to jump to airports starting with that letter.
Alternatively, enter manual coordinates:
Field
Range
Latitude (N=+, S=-)
-90 to +90
Longitude (E=+, W=-)
-180 to +180
Heading
0 to 360
Altitude (ft)
-800 to 55000
Spotter Mode
A simple observation mode for watching traffic from a fixed location. The Follow button in the aircraft detail panel lets you track a specific aircraft as it moves.
ATC Mode
An advanced observation mode with additional ATC-specific features:
MVA/MORA altitude alerts — Red *ALT warnings for aircraft below safe altitudes
LAN Mode (Pro license required) lets multiple RealTraffic instances on the same local network share their simulated aircraft positions. Each instance appears as traffic on the other instances' maps.
Open Settings > LAN Mode Settings to configure:
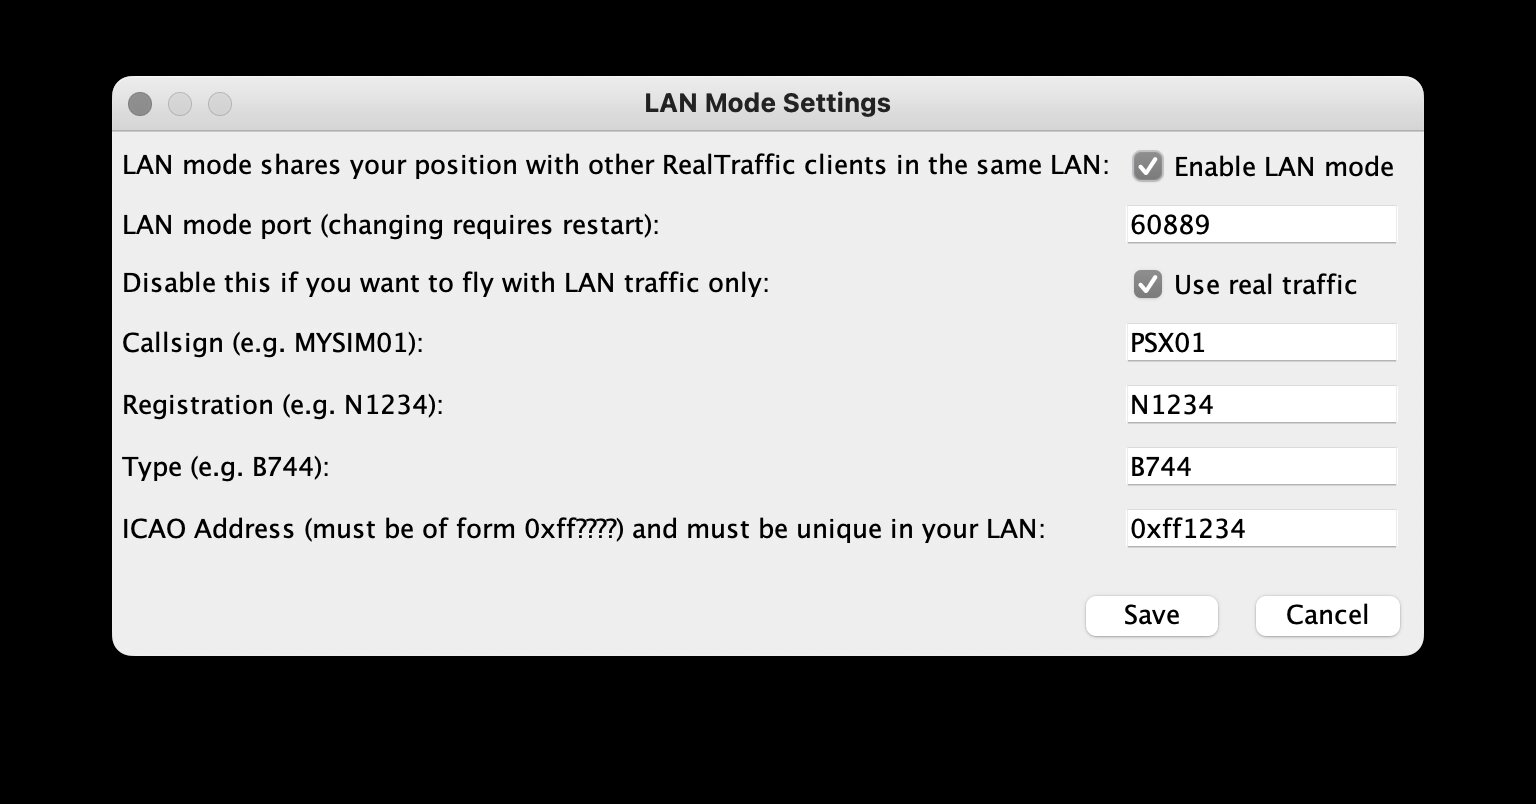
LAN Mode Settings — configure your aircraft identity and network port for multi-instance LAN traffic sharing.
Setting
Description
Enable LAN mode
Master toggle for LAN position sharing
LAN mode port
UDP port for LAN broadcast (requires restart if changed)
Use real traffic
When unchecked, only LAN-mode traffic from other instances is shown
Callsign
Your simulated aircraft's callsign (alphanumeric)
Registration
Your aircraft's tail number
Type
ICAO aircraft type code (e.g., B744)
ICAO Address
24-bit hex address (must start with 0xff and be unique on the LAN)
Own Aircraft Identity
In the Standard Settings panel, you can set your own aircraft's identity for LAN mode and XTRAFFIC broadcasts:
Inject own aircraft — Sends your simulated aircraft into the real traffic stream
Show other simulated traffic — Displays simulated aircraft (hex IDs > 0xFF0000) on the map
Configurable callsign, type, registration, departure, and destination
Navigation database (SQLite, auto-extracted from app)
customclient.ini
LAN mode client settings
customplaces.json
User-defined custom places (see Custom Places below)
DFDR.log
Digital Flight Data Recorder log
Custom Places
You can define custom locations that appear in the Spotter/ATC location airport dropdown alongside the navigation database airports. Create a file called customplaces.json in the settings directory with the following JSON format:
Short identifier shown in the dropdown and on the map
name
Descriptive name shown alongside the key
lat
Latitude in decimal degrees (N=positive, S=negative)
lon
Longitude in decimal degrees (E=positive, W=negative)
hdg
Default heading in degrees (0–360)
Custom places appear in the airport dropdown as MYSPOT My Spotting Location and are drawn on the map as small circles with their key and name labels when the APTs overlay is enabled. The file is read at startup — restart RealTraffic after editing it.
Debug Mode
Debug mode produces detailed log files for troubleshooting. To enable it, create a directory named debug<N> in the settings folder, where N is a bitmask of the debug categories you want: